 Player Manual
Preface
Thank you for purchasing the PC edition of AI Shoujo! (Windows 8.1 / 10)
Before starting your game, we recommend that you read this manual thoroughly.
Before starting your game, we recommend that you read this manual thoroughly.
Terms of Service
Make sure to read this before playing.
We recommend backing up your hard drive and your game, and that you use your best judgment in the game's operation.
○This game is a work of fiction!
Any names, organizations, locations, or events appearing in this game are fictitious. Any resemblance to real names, organizations, locations, events, etc. is purely coincidental.
This game is only intended for mature audiences of ages 18 and above. The purchase and play of it by minors under the age of 18 is expressly forbidden.All characters appearing in this game are over the age of 18.
In addition, uploading or sharing this game on the Internet is expressly forbidden, as is the rental or resale, or any equivalent act.
○Streaming, distributing, selling, using this program for profit, and other similar uses are prohibited.
This program is intended for use as a game. Using it for other purposes is prohibited.
Illusion holds the rights to all data created with this game, such as character data or game screenshots.
○This game includes scenes of graphic violence and criminal acts. Do NOT attempt to mimic or reproduce the things you see in this game in real life.
All acts depicted in this game are fully and mutually consensual, and completely fictional. Attempting to perform the actions seen in this game in real life may result in criminal litigation or arrest.
○For health purposes, we recommend taking 10 to 15 minute breaks for every 1 to 2 hours you play.
Consult with a physician before playing if you have ever experienced temporary loss of consciousness or seizures when watching TV, or as a result of any other strong source of stimulation.
If you experience these symptoms while playing, immediately turn off the game and consult with a physician.
Note: While all ©/™ symbols have been removed, all trademarked product names are the property of their registered owners.
DISCLAIMER
○Illusion may not be held responsible for any problems, losses, or damages incurred by the use of this game.We recommend backing up your hard drive and your game, and that you use your best judgment in the game's operation.
○This game is a work of fiction!
Any names, organizations, locations, or events appearing in this game are fictitious. Any resemblance to real names, organizations, locations, events, etc. is purely coincidental.
This game is only intended for mature audiences of ages 18 and above. The purchase and play of it by minors under the age of 18 is expressly forbidden.All characters appearing in this game are over the age of 18.
PROHIBITED ACTIONS
○The unauthorized reproduction or distribution of all or part of this game, game data, or manual is illegal.In addition, uploading or sharing this game on the Internet is expressly forbidden, as is the rental or resale, or any equivalent act.
○Streaming, distributing, selling, using this program for profit, and other similar uses are prohibited.
This program is intended for use as a game. Using it for other purposes is prohibited.
Illusion holds the rights to all data created with this game, such as character data or game screenshots.
○This game includes scenes of graphic violence and criminal acts. Do NOT attempt to mimic or reproduce the things you see in this game in real life.
All acts depicted in this game are fully and mutually consensual, and completely fictional. Attempting to perform the actions seen in this game in real life may result in criminal litigation or arrest.
WARNING
○Do not sit or stand too close to your monitor.○For health purposes, we recommend taking 10 to 15 minute breaks for every 1 to 2 hours you play.
NOTICE
○Playing games while tired or for long periods of time can be bad for your health. Remember: Your health comes first!Consult with a physician before playing if you have ever experienced temporary loss of consciousness or seizures when watching TV, or as a result of any other strong source of stimulation.
If you experience these symptoms while playing, immediately turn off the game and consult with a physician.
Note: While all ©/™ symbols have been removed, all trademarked product names are the property of their registered owners.
System Requirements
-
- Required
- Recommended
- OS
- Windows 8.1 / 10 64bit ※1
- DirectX
- DirectX 11
- CPU
- Intel Core i3 4000 *2
- Intel Core i5 4000 *2
- RAM
- 4GB
- 8GB
- HDD
- 20GB
- GPU
- VRAM 2GB *3 *4
- VRAM 4GB *3
- Peripheral Equipment
- Mouse (w/ mouse wheel), keyboard, monitor with resolution 1280 x 720 or higher (16:9 aspect ratio only)
-
*1 32-bit systems, touch controls, and virtual machines are not supported.
*2 Intel CPUs are recommended.
*3 Performance on GPUs older than the NVIDIA GeForce 700 Series or ATI RADEON R-200 Series is not guaranteed.
Graphic systems that include the phrases "integrated graphics card" or "shared system memory" are not included in our list of recommended hardware.
*4 When using systems with 2GB of VRAM, use the setting preset "Performance."
Caution: We may be unable to provide support for used or home-built PCs.
Caution 2: Performance of this game on a laptop may be worse than on a desktop listing the same PC specs.
Caution 3: Performance cannot be guaranteed on any OEM PC that has had its drivers updated or parts replaced.
With all that being said, Illusion will do its best to provide friendly and helpful customer support. However, we cannot guarantee this game's performance on every possible combination of PC part or driver.
•To find out if your computer meets the system requirements, contact your PC's manufacturer.
•Be aware that the amount of unused hard drive space required may vary by system.
•The game may not function properly with out-of-date drivers, even if your system meets the game requirements.
Basic Controls
- ○Windows Controls
-
The following are descriptions of the basic game controls used in this manual.
①Left-Click : Press the left button on your mouse. ②Right-Click (Drag) : Press and hold the right mouse button and move the mouse.
We often use the phrase "select the (X)" in this manual. For clarification, this is defined as moving your mouse to the item indicated by (X), then left-clicking it.
For Example: The sentence "Select the Confirm button" indicates that you should move the mouse pointer over the Confirm button and left-click it.
Note: Some operations may ask you to copy, move, or delete files from your computer. If you do not know how to perform these operations, please contact your computer manufacturer for help.
- ○Camera Controls
-
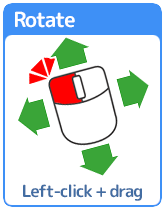
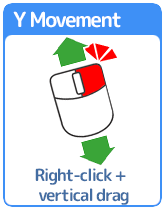
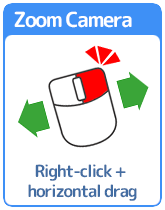
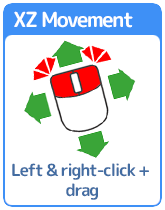
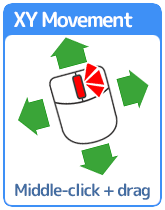
Camera controls can be used on screens even when menus or buttons are not displayed, such as on the Character Creation, Sex Scene, and Housing screens.
- ○Adjusting the Slider/Colors
-
When adjusting slider variables using the mouse, you can also adjust the color by using the color panel. Note that the mouse cannot be used to adjust transparency in this way, as there is no transparency option on this screen.

- ○Check Boxes
-

Check boxes allow you to toggle options between ON and OFF.
Initial Settings
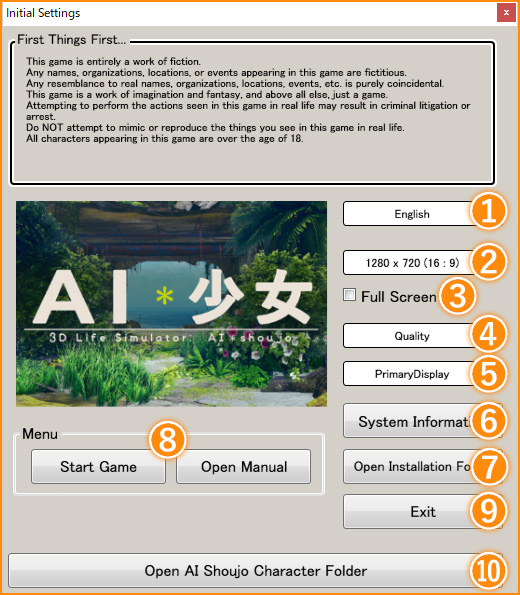
■Launching Ai Shoujo from your desktop will display the game launcher. You can configure the game's basic settings here.
-
① Language
Please select your language.
② Screen Resolution Selects the resolution in which to display the game.
③ Full Screen Display Toggle Check this box to enable full screen display, or deselect it to display the game in a window.
If you have trouble getting the game to run normally in Full Screen Mode, try Windowed Mode.
④ Setting Presets •Performance Configures the game to minimize system requirements.
•Normal Configures the game to balance graphic quality and speed.
•Quality Configures the game for high spec PCs.
⑤ Display Selects the screen in which to display the game when using Full Screen Mode with multiple monitors. Note: This setting has no effect when using only one monitor.
-
⑥ System Information
Displays information about your computer.
⑦ Open Installation Folder Opens the folder in which this game is installed.
⑧ Launch Menu •Start Game The game will load into the Title Screen.
•Open Manual Displays the game manual. (The one you're looking at right now!)
⑨ Exit Exits the game launcher.
⑩ Open AI Shoujo Character Folder Opens the folder in which AI Shoujo custom character data is saved.
The User Folder
-
Selecting "Open Installation Folder," will display the "UserData" folder. This folder contains data saved from a number of different sources.
-
[ audio ]
Add any music files you want to be able to play* with audio Housing items here.
*Only .wav format files are supported.
[ bg ] Add any custom backgrounds* you want to use in Character Creation here.
*Only images in the .png format are supported. A 16:9 aspect ratio is also recommended.
[ Cap ] Stores images taken in Camera Mode or with the Screenshot function.
[ Chara ] Stores character data that has been saved.
Note: Within this folder, characters are divided into the "female" and "male" folders, depending on the gender of the character created.
-
[ cardframe ]
Foreground and background frames used in Character Creation are stored here.
Foreground frames are stored in the "Front" folder, and background frames are stored in the "Back" folder.
[ Coordinate ] Stores the custom clothing sets saved in the Character Creator.
[ housing ] Saved Housing configurations are stored here.
[ 01 ]Contains housing data for the beach and forest areas (100 x 80 x 100).
[ 02 ]Contains housing data for the ruins area (200 x 100 x 200).
[ 03 ]Contains housing data for the Residential Island area (500 x 220 x 500).
[ save ] Contains saved World data.
Title Screen

-
Game Start
Starts the game. (Takes you to the Create/Load World Screen.)
Character Creation Opens the Character Creation screen, which allows you to create characters for use in this game.
•FemaleOpens the Character Creation screen for female characters.
•MaleOpens the Character Creation screen for male characters.
•BackReturns to the previous screen.
Uploader You can share the created data.
・Upload You can upload the created data.
・DownloadYou can download the posted data.
•BackReturns to the previous screen.
Options Allows you to adjust game settings.
Quit Exits the game.
Character Creation
■Character Creation
-
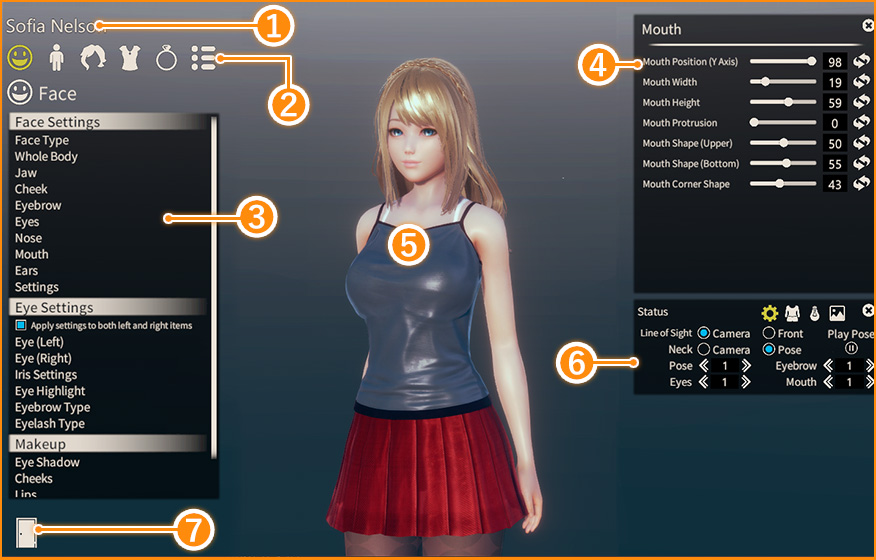
①Name
Displays the name of the character currently being edited.
Character name can be changed in the Character Settings section of the Options menu.
②Main Menu The various customization categories. Select a button to open a more detailed list. (See "③Customization Options.")
From the left, these buttons are: Face, Body, Hair, Outfit, Accessories, and Options.
③Customization Options Displays the sub-categories for the category selected in ②Main Menu.
Clicking one will bring you to the ④Customization Panel.
④Customization Panel Customize the sub-category selected from the ③Customization Options menu here.
The many different customization options can be adjusted with buttons, sliders, etc.
For more information, see Adjusting Facial and Body Features, Selecting Types and Colors, and Accessory Settings.
Click (x) to hide the window. To display the window again, select the Customization Option again.
Additionally, windows with (x) in the corner can be moved by left-clicking and dragging on the top of the window where the (x) is not displayed.
⑤Character Viewer Displays the character currently being edited. Use the camera controls to rotate and view this character from any direction.
⑥Display Options Adjust various aspects of the character viewer, such as the character's expression and pose, the lighting, and the background image.
Note that this is for viewing purposes only, and will not change how the character appears in the game.
⑦Back Exits the Character Creation screen.
Warning: Unsaved data in the character viewer will be lost.
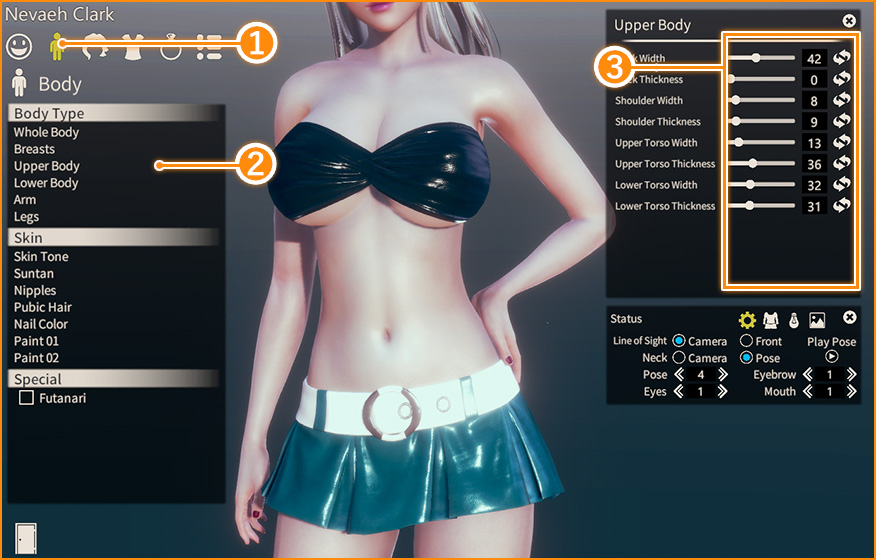
■Adjusting Facial and Body Features (Sliders): Sliders are used to adjust the shape and size of facial and body features. The following is an example of how to use them to adjust a character's body.
-
①
Select the Body icon from the Main Menu.
② Select the option you want to adjust from the menu on the left.
③ Adjustable components and sliders will be displayed.
Sliders can be adjusted directly or by entering a value to the slider's right.
All sliders in the Facial and Body Features are adjusted in the same way.
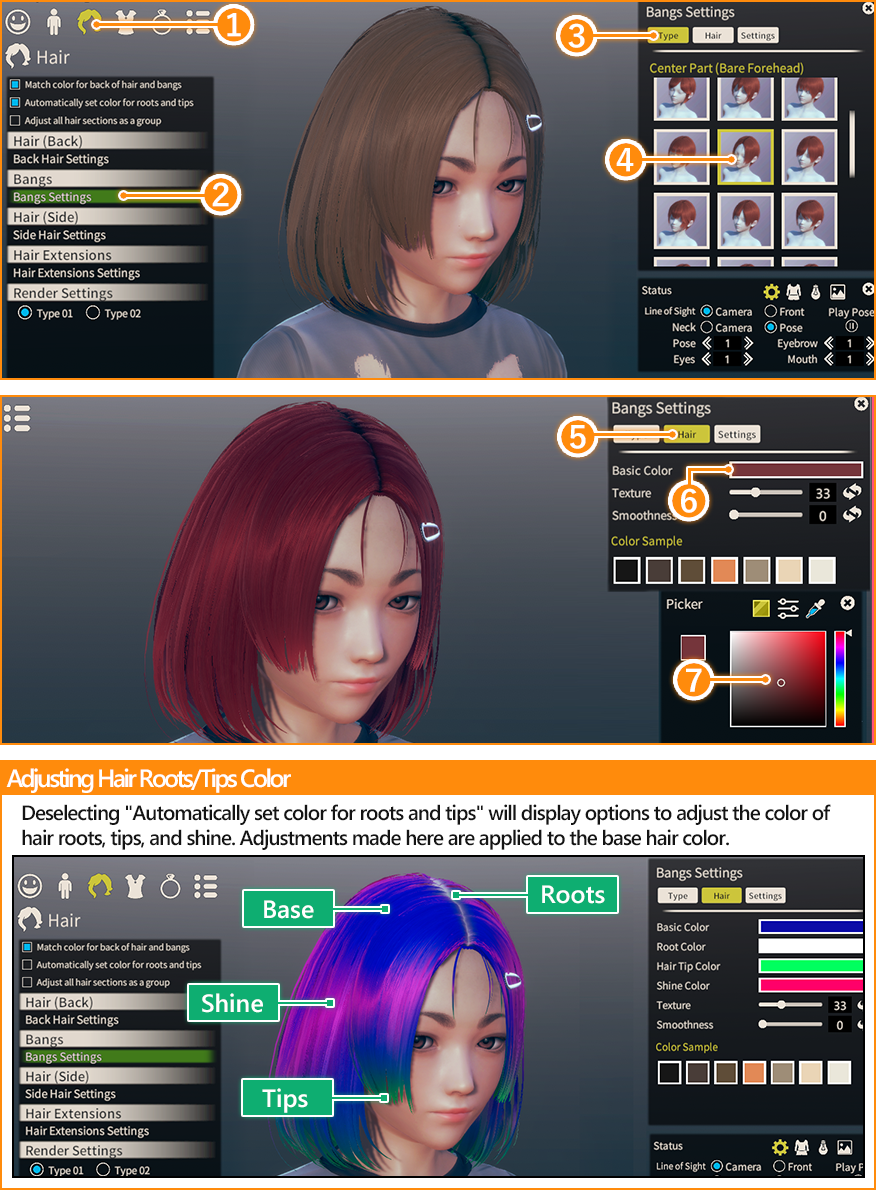
■Selecting Types and Colors: Many options include sub-options to adjust their type or color. The following is an example of adjusting these properties for bangs.
-
①
Select the Hair icon from the Main Menu.
② Select "Bangs Settings" from the menu on the left.
③ Select "Type" from the Customization Panel.
④ A list of bang options will be displayed. Select a type of bangs.
⑤ Select "Hair Settings" from the Customization Panel.
⑥ Select the option showing color for an item you want to adjust.
⑦ A color editing window is displayed.
Select a color using the Picker, the Slider, or the Presets.
・Some clothes and accessories also have secondary color options.
・Some items have a transparency option. Adjust this with the "Transparency" slider.
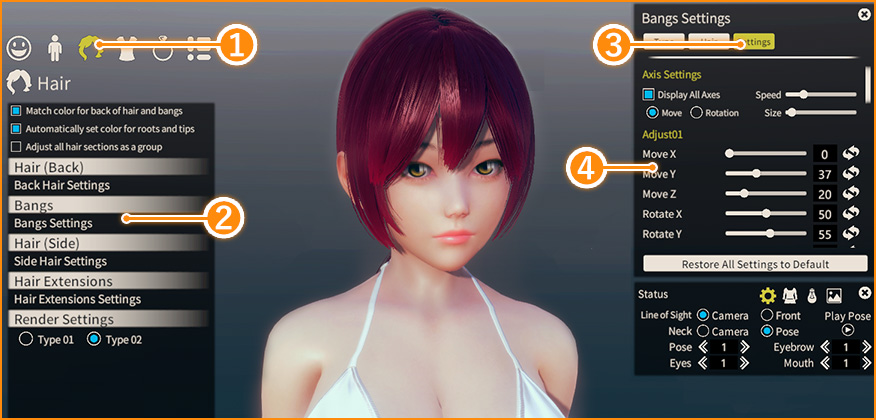
■Adjusting Hair:Entirely new hairstyles can be created by adjusting hair settings. Note that some hairstyles have different customization options.
-
①
Select the Hair icon from the Main Menu.
② Select the hairstyle to adjust from the Customization Panel.
③ Select "Settings" from the Customization Panel.
④ Customize settings here to adjust the selected hairstyle.
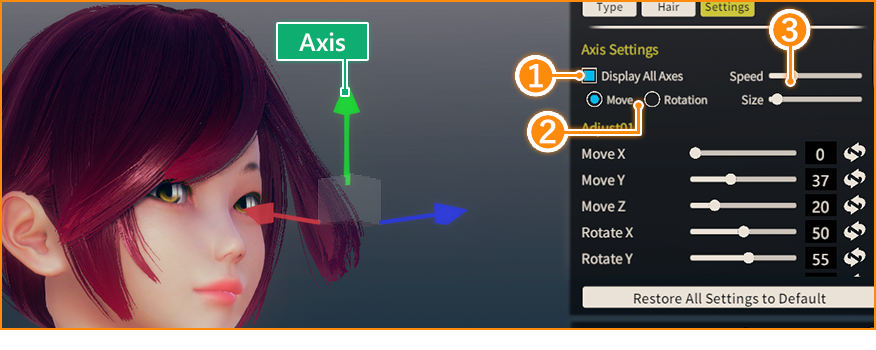
- ■The Axis: You can directly control object position with the Axis.
-
①Enable the Axis.
An axis controller will appear when you enable the "Axis" box.
※With this enabled, you can left-click and drag the mouse to move and rotate the selected section of hair.
②Move/Rotate Switches between types of Axis movement.
③Speed/Size ・Speed Affects how quickly the object will move when manipulated.
•Size Affects the size of the Axis.
- ●Adjusting Hair: Entirely new hairstyles can be created by adjusting hair settings. Note that some hairstyles have different customization options.
-
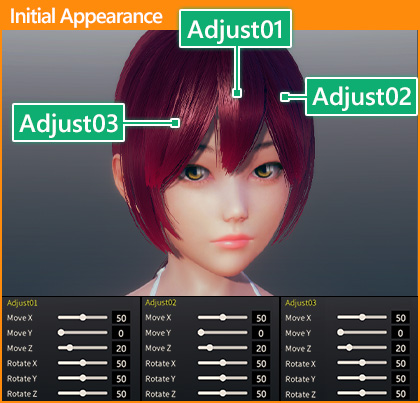
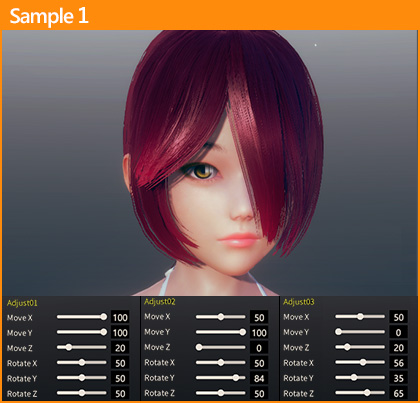
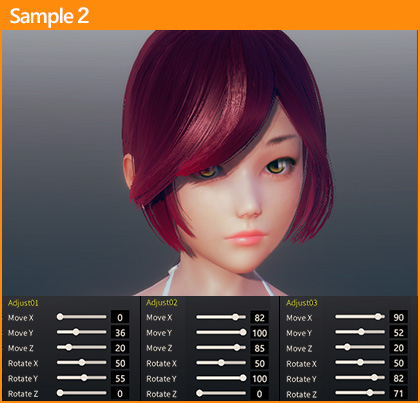
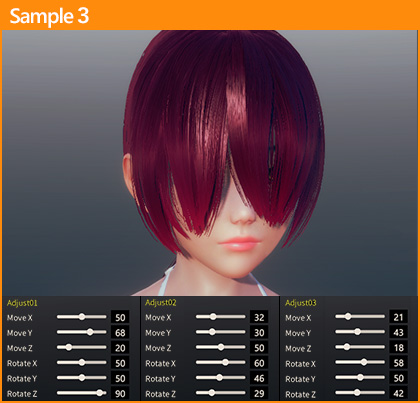
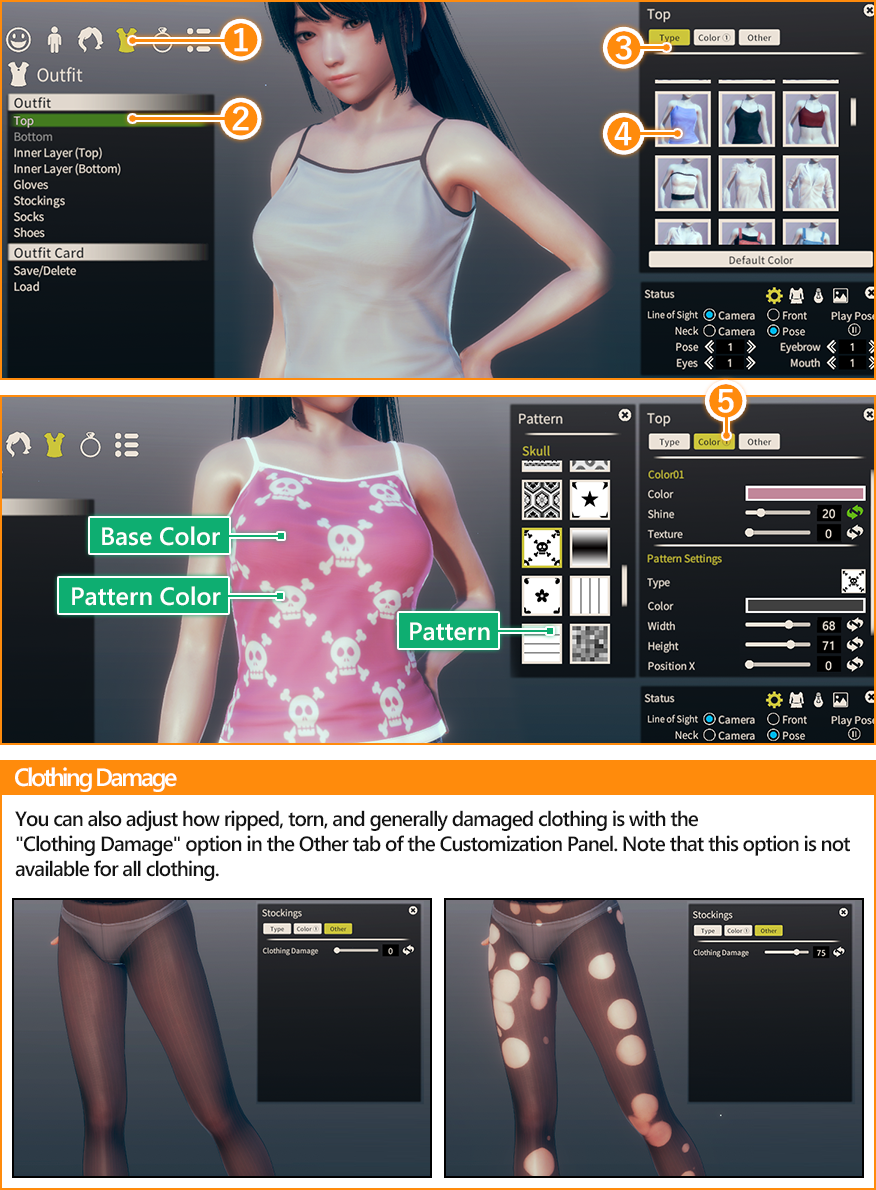
■Clothing Settings: Shirts, underwear, and other clothing types can be customized from this screen.
-
①
Select the Outfit icon from the Main Menu.
② Select the clothing category to edit from the menu on the left.
③ Select "Type" from the Customization Panel.
④ A window will appear from which you can choose different options.
⑤ Select "Color ①" (etc.) to customize the color/pattern of that part of the outfit.
Note that some items have different color customization options.
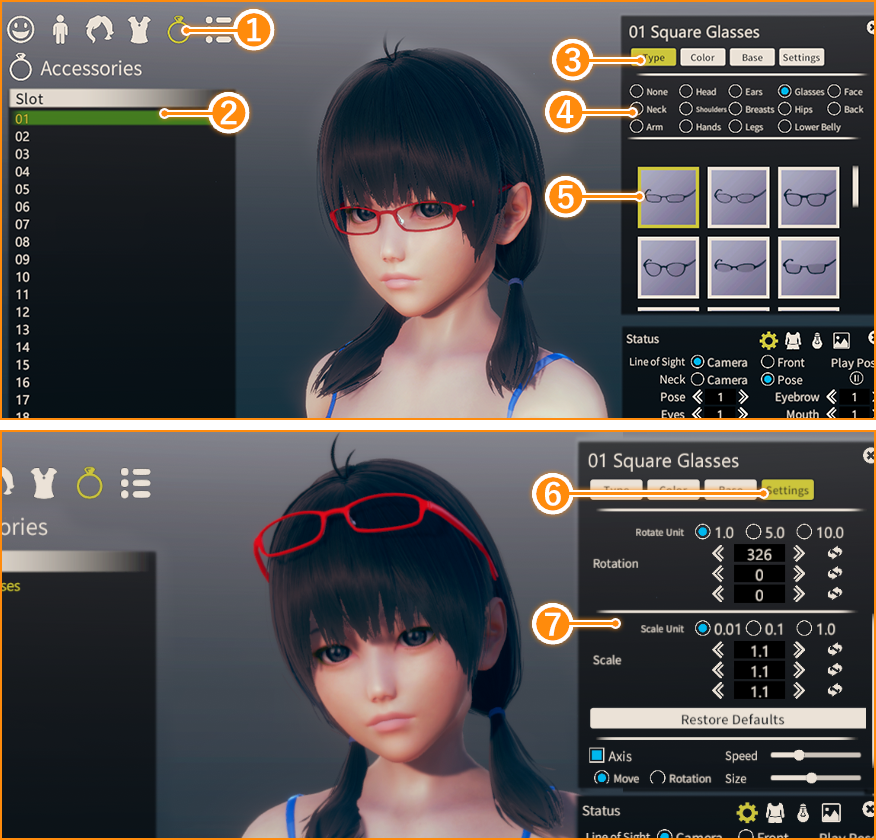
■Accessory Settings: Up to 20 accessories can be used at once, and you can customize their size and position. The following is an example of how to place a pair of glasses on a character's head.
-
①
Select the Accessories icon from the Main Menu.
② Select a slot. In this example, Slot 01 is selected.
③ Select "Type" from the Customization Panel.
④ Select an accessory category. In this example, "Glasses" is selected.
⑤ A list of accessories will be displayed for the selected category. Select an accessory.
⑥ Select "Settings."
⑦ Various customization options are displayed. Here, we will adjust settings in "01 Settings."
Adjust the various X, Y, and Z positions by left-clicking and dragging, or by entering a value.
•Position (X Axis)Adjusts the object's horizontal position.
•Position (Y Axis)Adjusts the object's vertical position.
•Position (Z Axis)Adjusts the object's depth.
•Rotation (X Axis)Rotates the object horizontally.
•Rotation (Y Axis)Rotates the object vertically.
•Rotation (Z Axis)Rotates the object clockwise.
•Size (X Axis)Adjusts the object's horizontal size.
•Size (Y Axis)Adjusts the object's vertical size.
•Size (Z Axis)Adjusts the object's thickness.
Some accessories may display additional customizable options. These are listed as "02 Settings," etc.
The color can be adjusted via the Color tab.
Adjusting the object's Base Position changes the focal point that the object moves in tandem with.
The position, size, and angle of objects can be adjusted via the Settings tab.
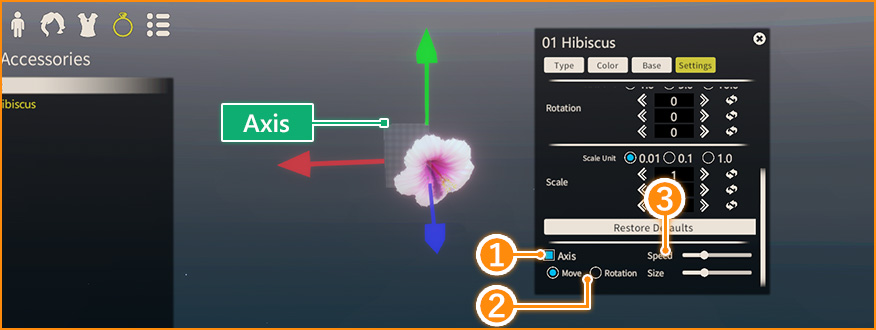
- ■The Axis: You can directly control object position with the Axis.
-
①Enable the Axis.
An axis controller will appear when you enable the "Display Axis" box.
With this enabled, you can left-click and drag the mouse to move and rotate the accessory.
②Move/Rotate Switches between types of Axis movement.
③Speed/Size ・Speed Affects how quickly the object will move when manipulated.
•Size Affects the size of the Axis.
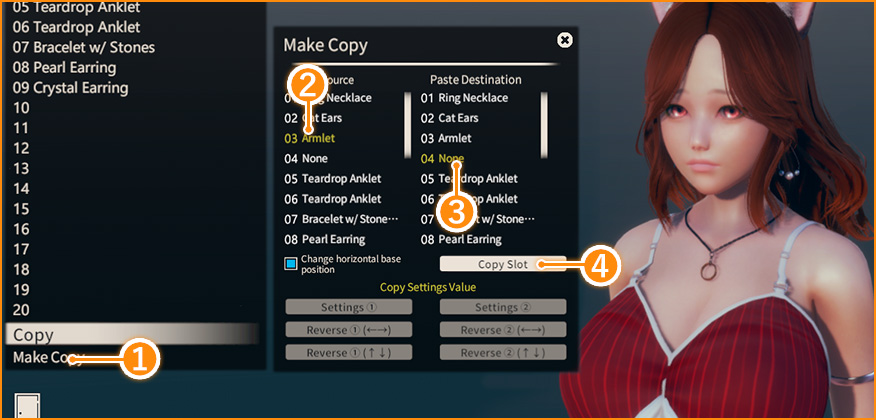
- ●Make Copy: This option allows you to duplicate accessories or copy customized accessory settings into another accessory slot.
-
①
After customizing an accessory, select "Duplicate" from the menu on the left.
② Select the Accessory Slot to copy the values from.
③ Select the Accessory Slot to copy the values to.
④ Select the object name to copy.
•Copy slotCopies the accessory in the Copy Source to the Paste Destination.
•Flip base position For objects with left/right base positions (e.g. ears), enabling this and selecting "Copy slot" will copy the accessory, but with the opposing base position.
•Copy part 01 settings Copies only the adjusted values from the copy source.
•Rotate & copy part 01 settings (←→) Flips the Rotation value (Rotate Y) in the copy source and copies it to the copy destination.
•Rotate & copy part 01 settings (↑↓) Flips the Rotation value (Rotate X) in the copy source and copies it to the copy destination.
■Saving and Deleting Outfits: Outfits allow you to manage custom combinations of clothes and accessories.
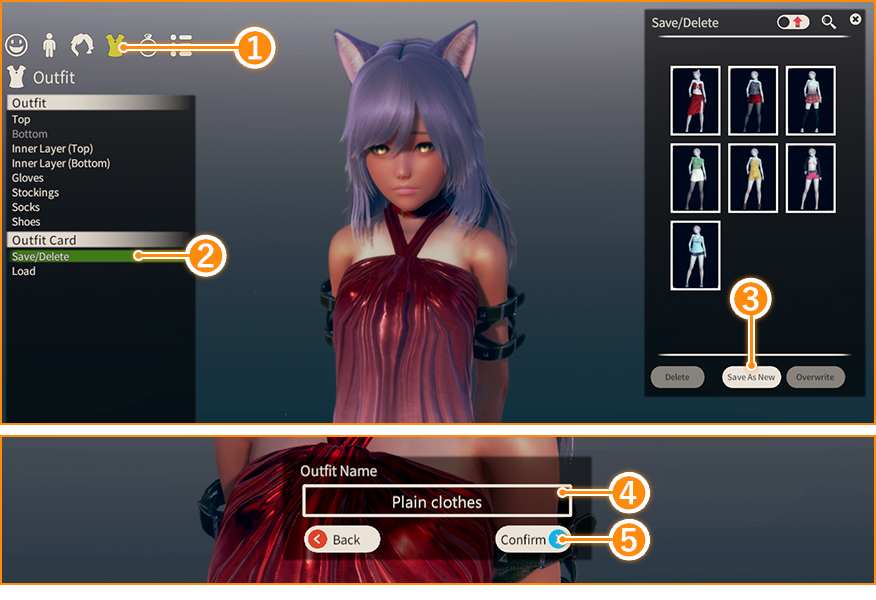
- ●Creating New Outfit Cards
-
①
Select the Outfit icon from the Main Menu.
② Select "Save/Delete" in the Outfit Card sub-category.
③ Select "Save As New" in the Customization Panel. A window to name this outfit will be displayed.
④ Enter an outfit card name.
⑤ Select "Confirm" to save the outfit card.。
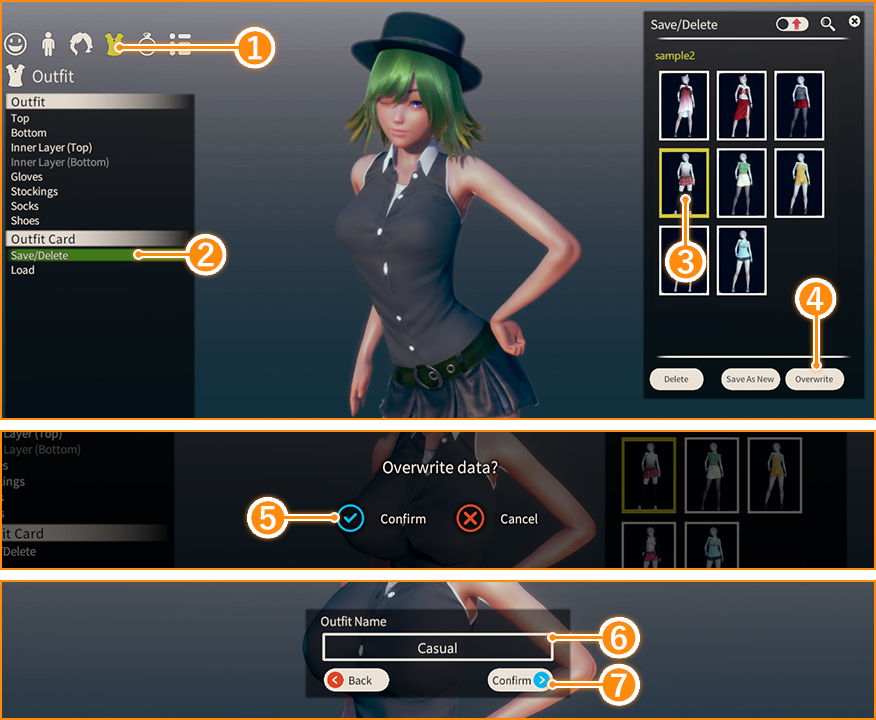
- ●Overwriting Outfit Cards
-
①
Select the Outfit icon from the Main Menu.
② Select "Save/Delete" in the Outfit Card sub-category.
③ Select the outfit card to overwrite from the Outfit Card List.
④ Select "Overwrite." A confirmation window will be displayed.
⑤ Select "Confirm." A window to name this outfit will be displayed.
⑥ Edit the outfit card name (optional).
⑦ Select "Confirm" to overwrite the outfit card.
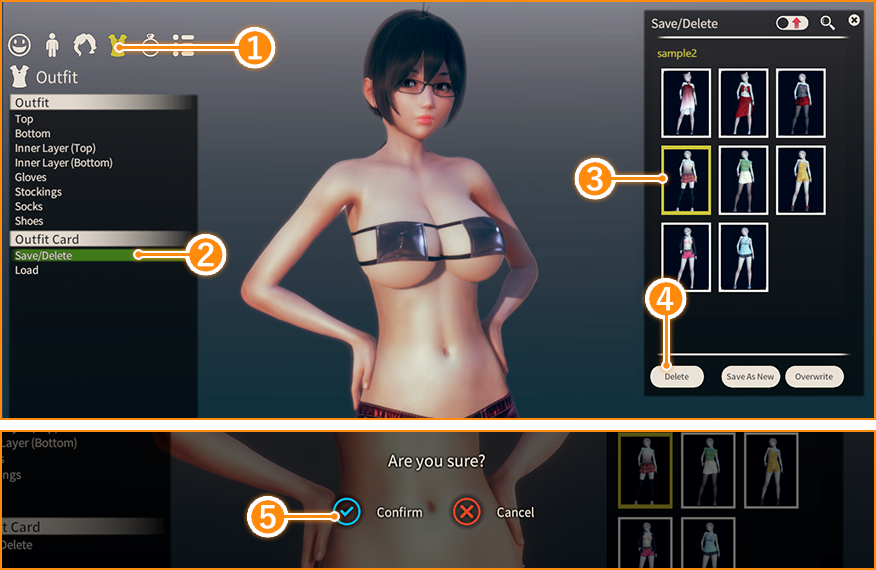
- ●Deleting Outfit Cards
-
①
Select the Outfit icon from the Main Menu.
② Select "Save/Delete" in the Outfit Card sub-category.
③ Select the outfit card to delete from the Outfit Card List.
④ Select "Delete." A confirmation window will be displayed.
⑤ Select "Confirm" to delete the outfit card.
Warning: This will delete the outfit data from your computer, not just the game.
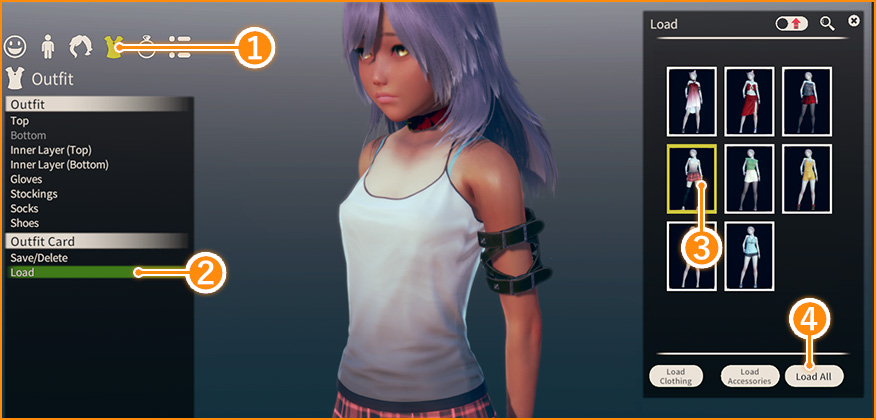
■Loading Outfits: Loading a saved outfit card allows you to apply them to a character. You can load entire outfits or individual aspects of them.
-
①
Select the Outfit icon from the Main Menu.
② Select "Load" from the Outfit Card section of the menu.
③ Select the outfit to load from the Outfit Card List.
④ Customize the parts of the outfit to load.
•Load ClothingLoads only the clothing from the selected outfit card.
•Load AccessoriesLoads only the accessories from the selected outfit card.
•Load AllLoads all data from the selected outfit card.
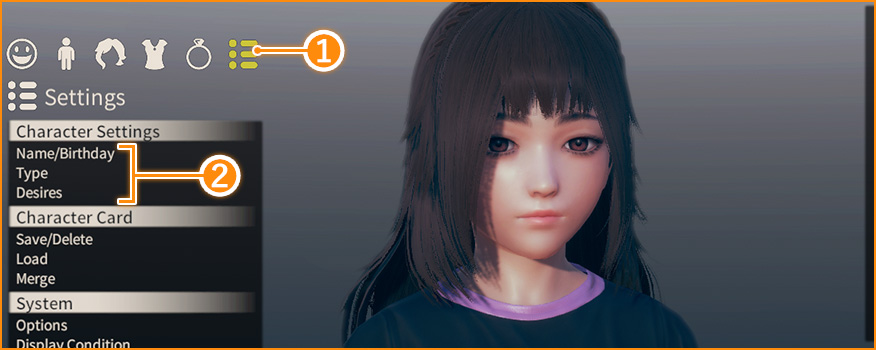
■Character Settings: These settings allow you to adjust a character's name, voice, and other settings.
-
①
Select the Options icon from the Main Menu.
② Sub-categories in the Character Settings menu can be adjusted.
•Name/BirthdaySets the character's name and birthday.
•Type Sets the character's voice type.
Selecting a voice type will cause a sample voice clip to play.
•Desires These control a character's internal motivations and affect their actions in-game.
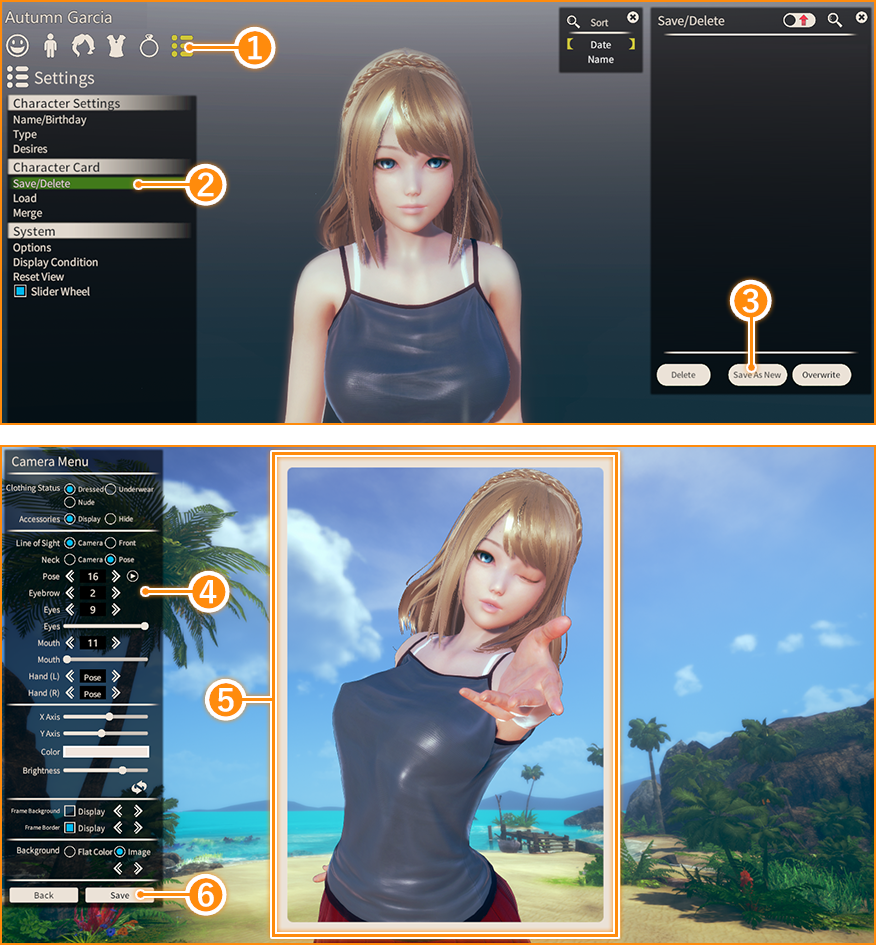
■Saving/Deleting Characters: When saving a character, you must also create a preview portrait.
- ●Saving New Characters
-
①
Select the Options icon from the Main Menu.
② Select "Save/Delete" in the Character Card sub-category.
③ Select "Save As New" in the Customization Panel to open the Photo Mode.
④ Customize your character's portrait by adjusting their expression, pose, the portrait frame, etc. with these options.
⑤ Use the camera to adjust the character's position etc. within the frame.
⑥ Click this to create the character card.
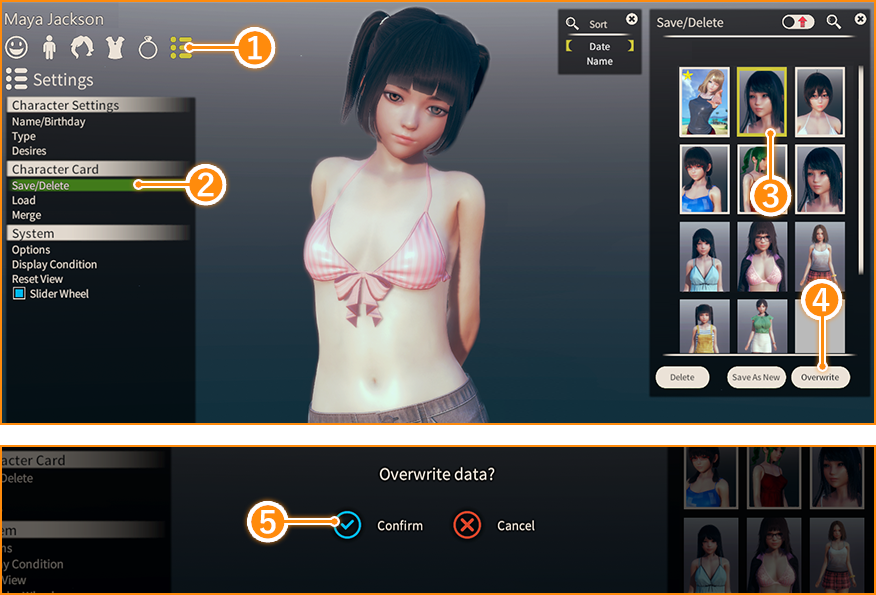
- ●Overwriting Characters
-
①
Select the Options icon from the Main Menu.
② Select "Save/Delete" in the Character Card sub-category.
③ Select the character card to overwrite from the list.
Note: Characters marked with a star (★) have been used in-game, and their stats have changed.
Overwriting their data will reset their stats to default.
④ Select "Overwrite." A confirmation window will be displayed.
⑤ Select "Confirm" to move to the Photo Mode.
Be aware that character data will be overwritten when you save in the Photo Mode.
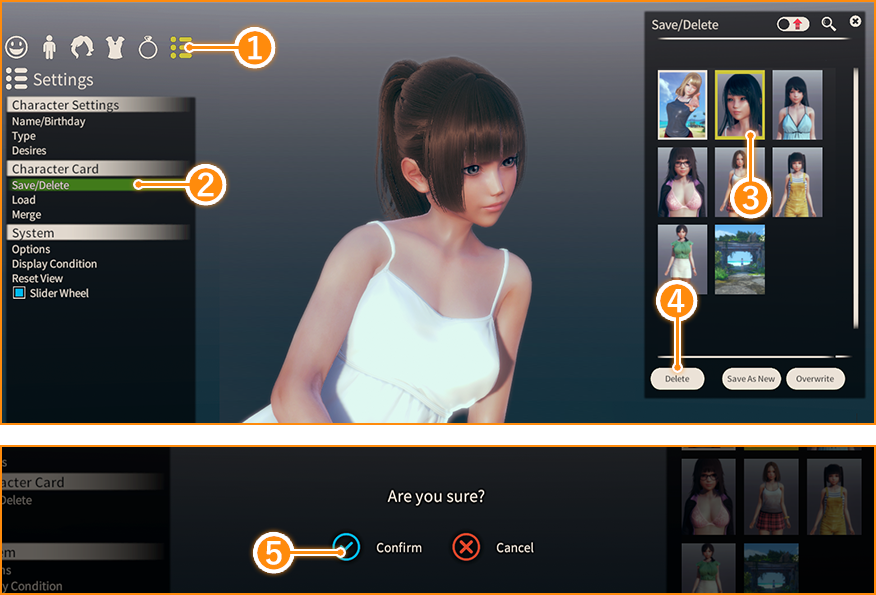
- ●Deleting Characters
-
①
Select the Options icon from the Main Menu.
② Select "Save/Delete" in the Character Card sub-category.
③ Select the character card to overwrite from the list.
④ Select "Delete." A confirmation window will be displayed.
⑤ Select "Confirm" in the confirmation window to delete the character card.
Warning: This will delete the outfit data from your computer, not just the game.
■Loading Characters: Saved characters can be loaded in their entirety, or you can load just their outfit or appearance.
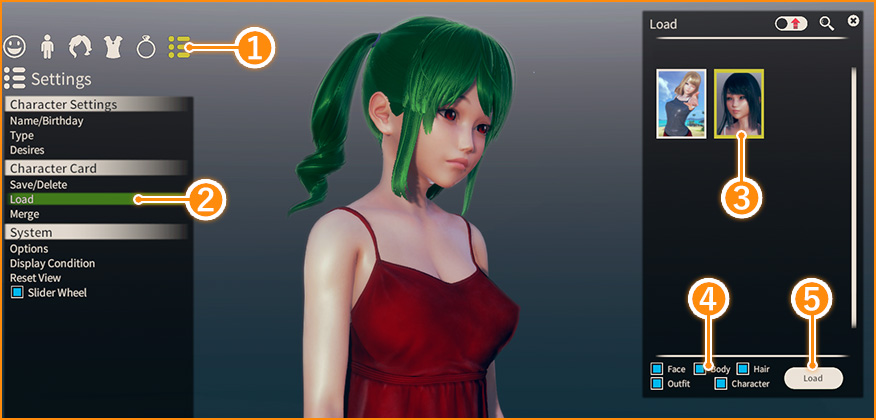
-
①
Select the Options icon from the Main Menu.
② Select "Load" in the Character Card sub-category.
③ Select the character card to load from the list.
④ Customize the character properties to load.
⑤ Click here to load the selected character data.
Be aware that any unsaved customizations/data will be lost upon loading.
■Merging Characters: Two characters can be merged, combining aspects of each of them to create a new whole.
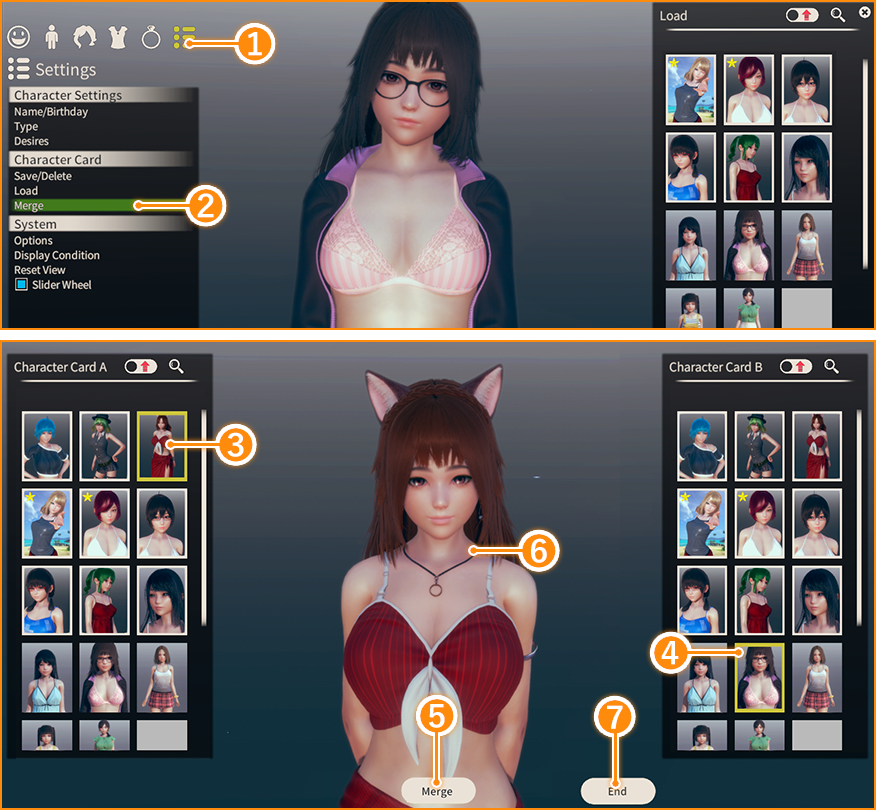
-
①
Select the Options icon from the Main Menu.
② Select "Merge" in the Character Card sub-category.
③ Select the first character (character A) from the list.
④ Select the second character (character B) from the list.
⑤ Click here to merge character A and character B.
⑥ You will see the newly-created character here.
Note that outfits will not be mixed and matched. The final outcome will use one of the two characters' outfits in its entirety.
⑦ Click here to exit the Merge screen.
■Creating Male Characters: Character creation for both male and female characters is almost exactly the same.
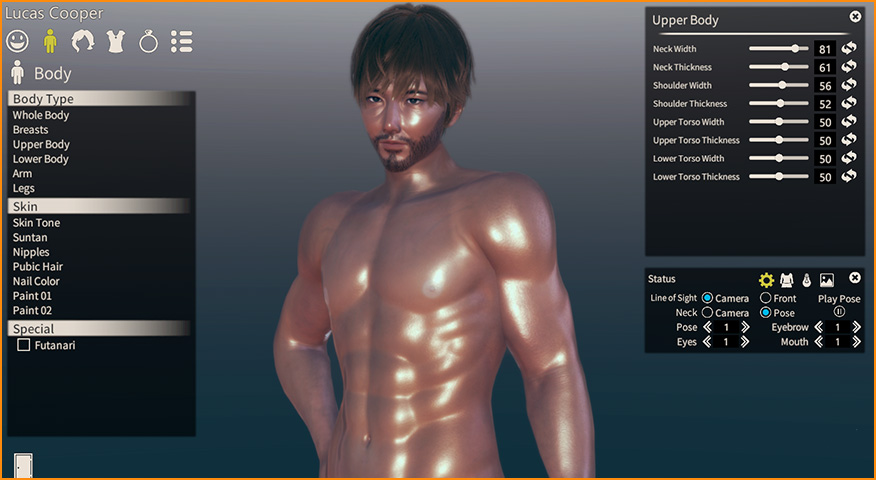
-
Follow the previous guide to learn how to create male characters. (Character Creation)
■Futanari Characters
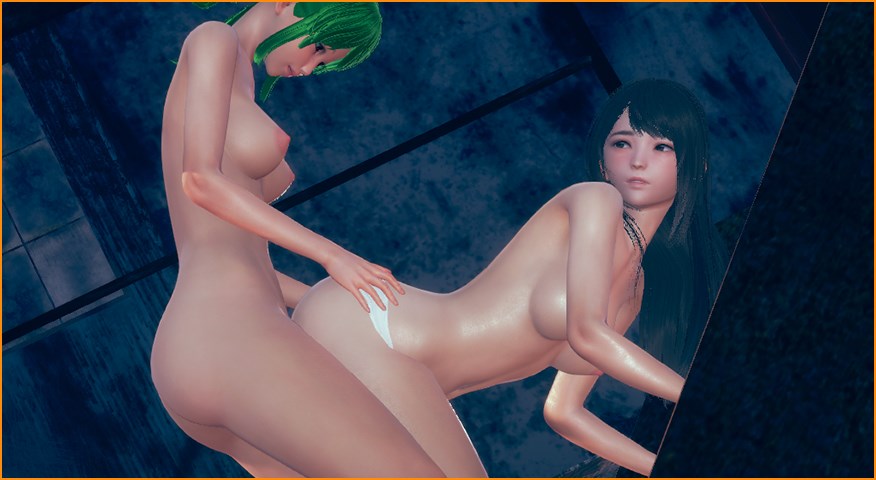
-
A female player character with the Futanari trait enabled will have a penis (and everything that entails) during sex scenes.
Note that this trait has no effect on female NPCs sharing the island with you.
Creating/Loading Save Data
Selecting "Game Start" from the Main Menu will display the save data management screen.
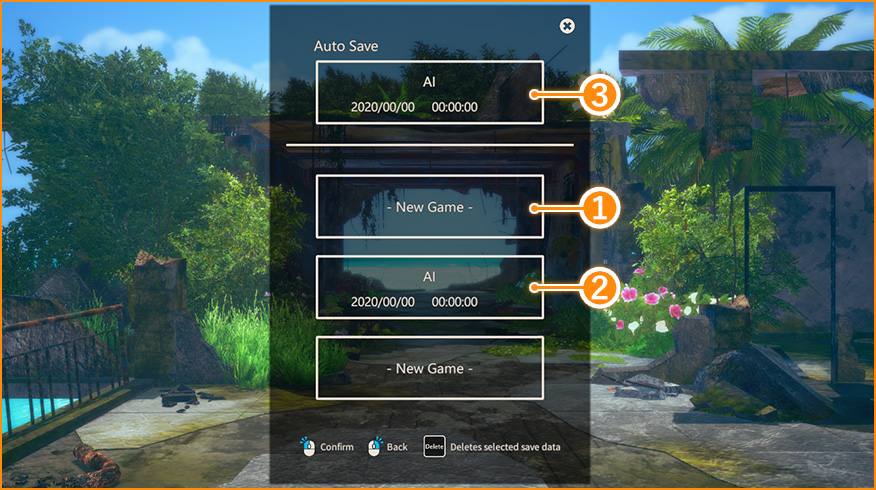
-
①Empty Save Slots
Select an empty save data slot to start a new game and move to the world creation screen.

②Save Slots (In Use) Select a save slot in use to load that saved game.
③Autosave Data This game automatically saves your game after a set period of in-game time has elapsed, or when changing an in-game character.
Select this save slot to load the latest autosave.
■Creating a World: Create a game world to explore and populate it with characters.
- ●Creating a World

-
①Enter World Name
Enter a custom name for your world. If you enter nothing, the world name will be "No Name."
②Confirm Click Confirm to create a world with your chosen name. Doing this will take you to the NPC selection screen.
- ●NPC Selection Screen
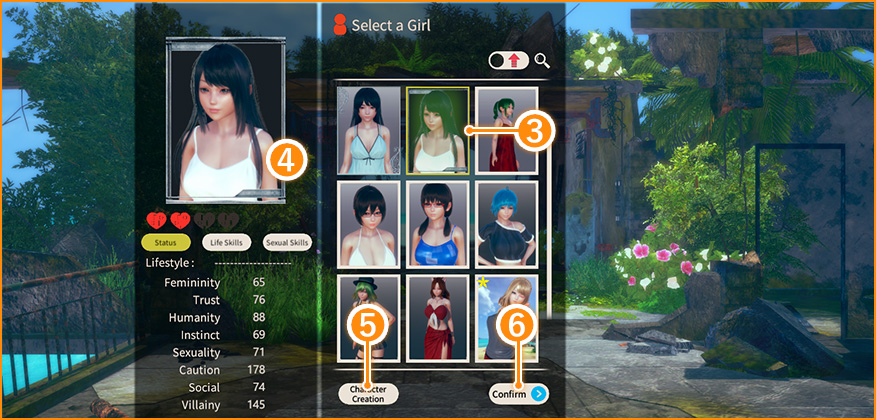
-
③Select Character
Select an NPC from the list to include in the game world.
Note: Characters marked with a star (★) have been used in-game, and their stats have changed.
④Character Information This section displays information on the selected character.
⑤Create Character Click here to move to the Character Creation screen, where you can customize and create new characters.
⑥Add Character Click here to add the selected NPC to the game world. After choosing an NPC, you will be taken to the Player Selection screen.
Note: Only one NPC can be initially selected when starting a new game.
- ●Player Selection Screen
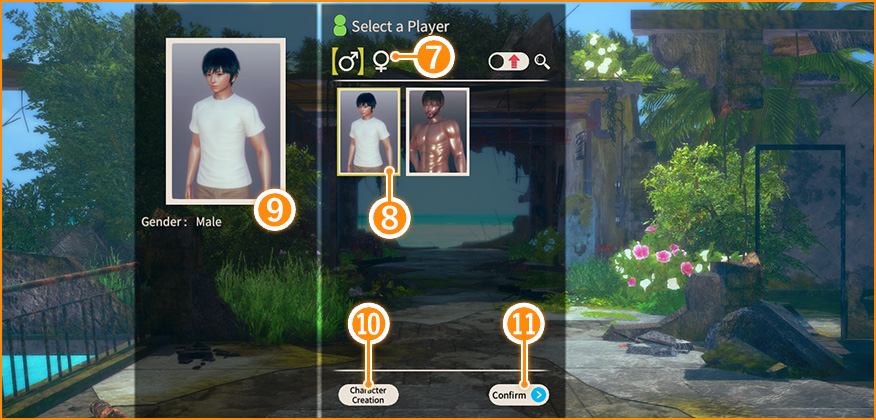
-
⑦Select Gender
Select a gender option to display a character list and choose a player character of that gender.
Player gender can be changed in-game later.
⑧ Select Character Select a character to use as your in-game avatar.
⑨ Character Information This section displays information on the selected character.
⑩ Create Character Click here to move to the Character Creation screen, where you can customize and create new characters.
(Note: You will be taken to the Character Creation screen for the gender chosen in ⑦.)
⑪ Add Character Click here to start the game with the selected player character.
■Deleting Saved Data
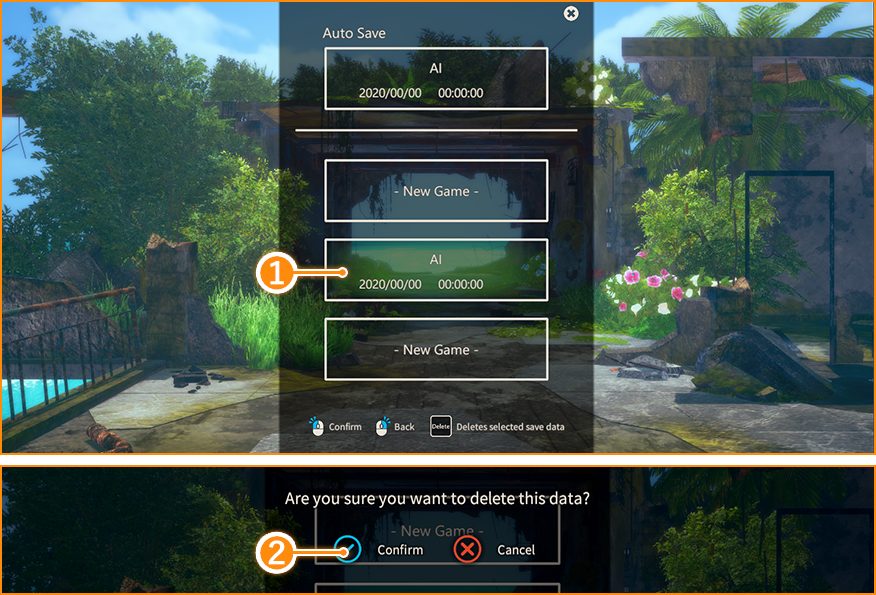
-
①
To delete a saved game, place your mouse cursor over the slot to delete and press the Delete key on your keyboard. A confirmation window will be displayed.
② Select "Confirm" in the confirmation window to delete the selected save data.
Warning: This will delete the outfit data from your computer, not just the game.
Game Screen

-
①Player Character
This character represents you in the game world. Control them to interact with the world around you.
②NPCs The female NPCs you hand-selected to join you in the world of AI Shoujo.
③Minimap A simplified view of the world around you.
④Story Help These are hints that point you to your next story objective.
⑤The Merchant Talk to this 100% honest (?) merchant to barter for goods.
⑥Item Gathering Point Interact with these points to gather items. The items you find can be used to Craft, Barter with the Merchant, or unlock new Housing items.
-
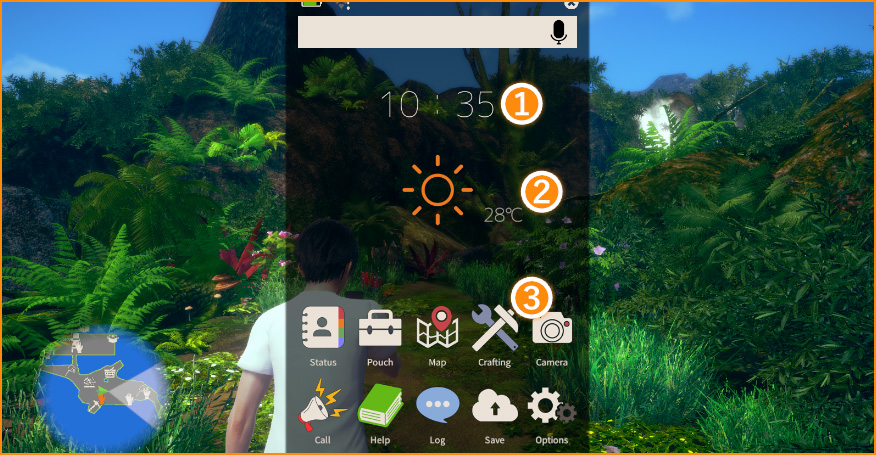
①Time
Displays the current time. Night starts at 18:00 o'clock.
②Weather & Temperature Displays the current weather and temperature. These factors affect visibility and NPC health.
③Menu Buttons A simplified view of the world around you.
・ Status Equip items and check NPC status.
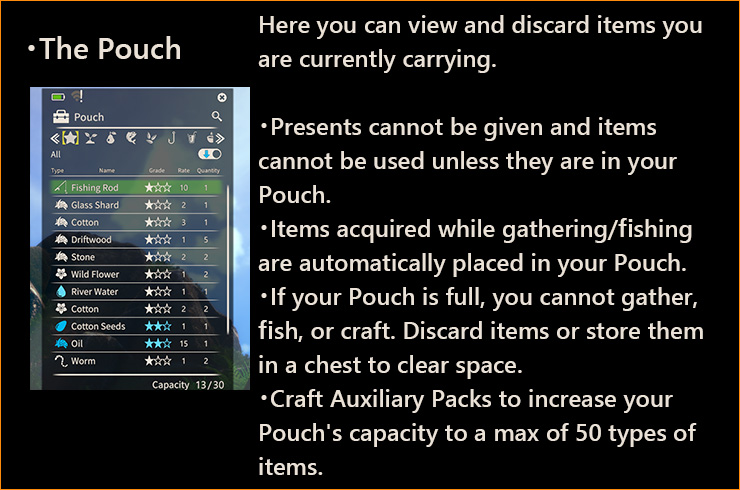
・ Pouch Displays the items you are currently carrying.
・ Map Displays the island map and your position. You can also warp to base camps by selecting them.
・ Crafting Opens the Crafting menu, where you can create new items by combining materials.
・ Camera Toggles the 1st-person camera mode, where you can take pictures.
・ Call Calls nearby NPCs to you. NPCs may not listen, depending on distance and their Trust stat.
・ Help Displays the tutorial and various loading screens.
・ Log Displays a log of system messages.
・ Save Saves your game. (Note: This overwrites the data in your current save slot.)
・ Options Allows you to adjust game settings.
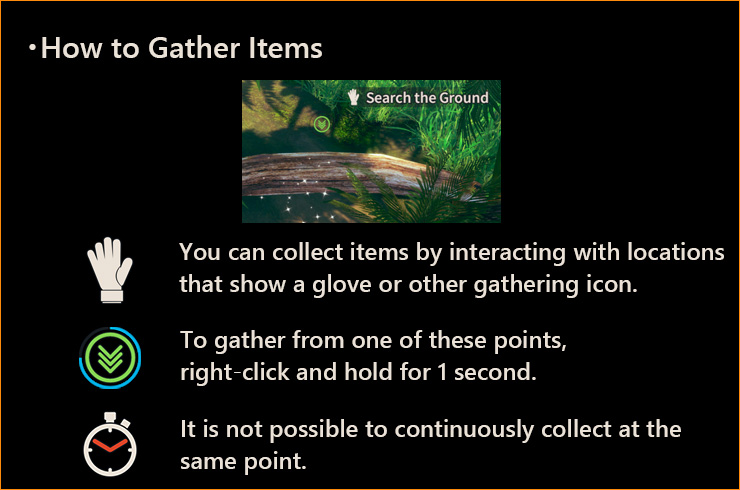
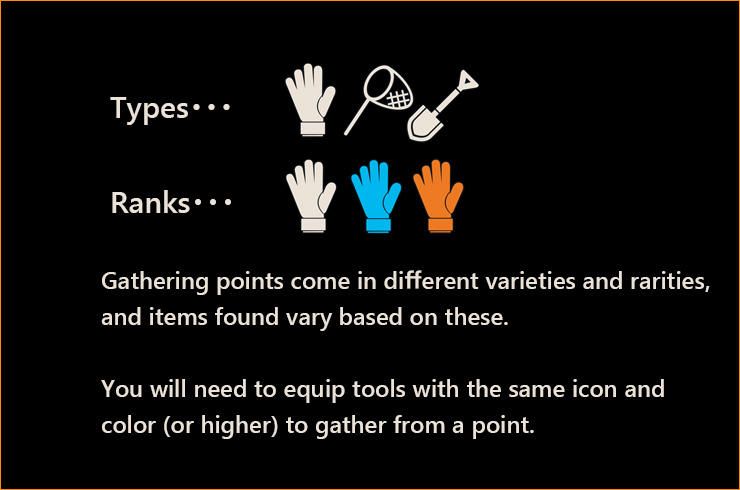
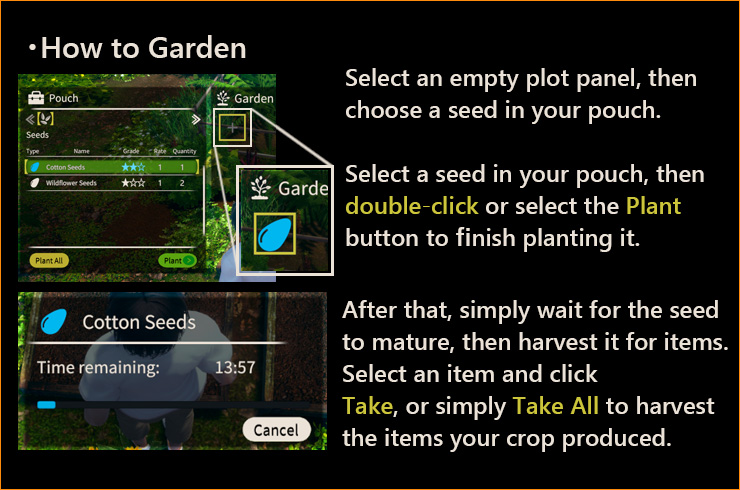
■Gathering: You can acquire all sorts of materials from the many gathering spots scattered across the island. Different spots may require different or higher level tools to harvest.
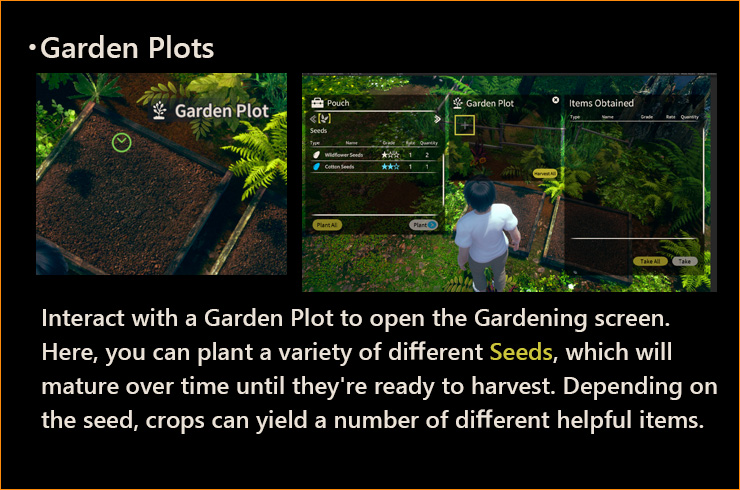
- ●Garden Plots
■Status:Equip items and check NPC status.
- ●Player Character
-
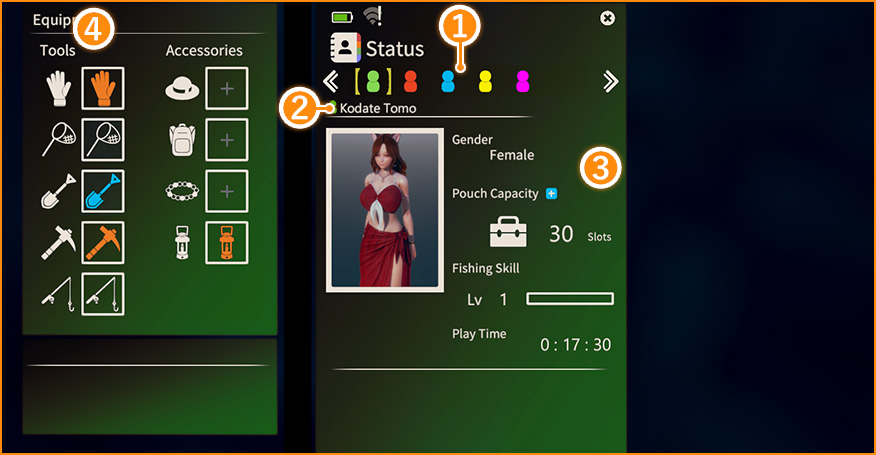
①Character Overview
This menu displays a list of characters currently on the island. Select a character icon to display their information.
The icon furthest to the left is the player character. The rest are NPCs added to the island.
②Character Name The name of the currently selected character.
③Player Status •Gender The gender of player character.
•Pouch Capacity The total number of item slots the player has to hold items.
The total number of item slots the player has to hold items. Crafting Auxiliary Packs and selecting will allow you to increase your capacity to a maximum of 50 item slots.
•Fishing Skill Your current fishing level. Higher levels increase damage done to fish, allowing you to catch them quicker.
•Play Time The amount of time you've spent on this island.
④Equipment The items this character currently has equipped. Select a slot to equip/unequip items.
- ●NPCs
-
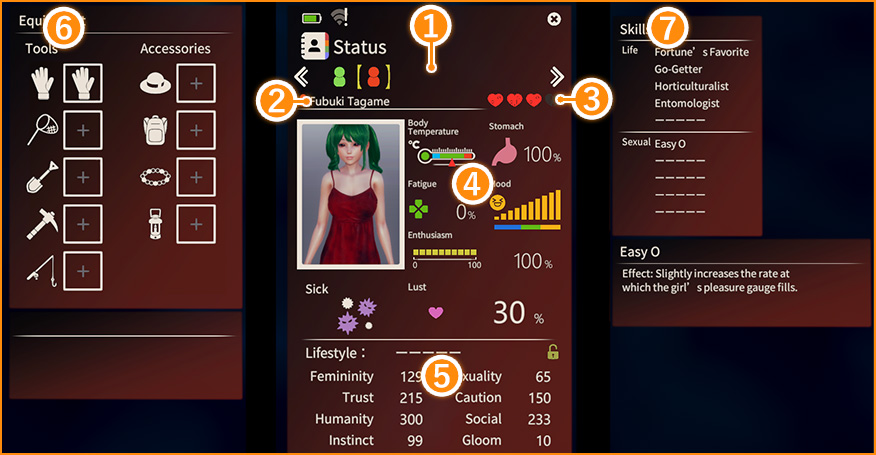
①Character Overview
This menu displays a list of characters currently on the island. Select a character icon to display their information.
The icon furthest to the left is the player character. The rest are NPCs added to the island.
②Character Name The name of the currently selected character.
③Phase (Level of Personal Growth) Life on the island is very educational,and an NPC's experiences will cause them to gain EXP in various stats.
Once their total EXP reaches a certain level, their Phase will increase (to a maximum of Phase 4).
An NPCs behavior and reactions will change as she matures.
④Condition How the NPC is currently feeling. These collectively affect her health, her behavior, and her reactions.
⑤Stats The experience an NPC has gained thus far. The higher the number, the more likely she is likely to take actions relating to these stats.
The Advice option selected during Communication can somewhat affect these parameters.
•Lifestyle Once an NPC reaches Phase 4, she will receive a lifestyle that reflects her personality and the experiences she has had thus far.
An NPCs lifestyle may subtly affect her behavior.
⑥Equipment The items this character currently has equipped. Select a slot to equip/unequip items.
Equipping an NPC with a tool will allow her to help gather items from applicable spots. (If she feels like it.)
⑦Skills Once an NPC reaches Phase 3, you can use Skill Items to teach that NPC skills.
These may be affected by her experiences on the island and interactions during sex.
Be aware that once a skill has been given to an NPC, it cannot be removed. To get rid of a learned skill, it must be overwritten by another.
Skill Items can be obtained through Gathering or from bartering in the Shop.
■The Pouch
■The Map: The map can be used to confirm your position and to warp to different base camps.

-
①Character Overview
A list of characters currently on the island. Increasing the number of island residents will add their icons to this list.
②The Player Icon The player's current location.
③NPC Icons The NPCs' current locations. Each NPC is represented by a different colored icon.
④Icons Click these icons to toggle their display on the map.
 All
All
 Camps
Camps
 Characters
 Merchant
 Cooking Spot
 Beds
Beds
 Toilets
 Baths
Baths
 Chairs
 Desks
Desks
 Harvest (Glove)
 Harvest (Pickaxe)
 Harvest (Shovel)
 Harvest (Net)
 Data Terminals
 Chests
 Garden Plots
 Story Points
⑤Destinations A list of camp spots on the map. Clicking one of these will teleport you there.
■Crafting:Opens the Crafting menu, where you can create new items by combining materials.


- ●Cooking/Special Crafting


Island Life


- ●Communication


Chests
Fishing
The Shop
Housing
Sex Scene
Data Terminals
-
Characters can be replaced or customized from Data Terminals. In addition, activating a Data Terminal that is hooked up to a Capsule enables you to add an additional NPC to the island.


Options

-
①Menu
Click a category to display it.
②Exit Exits the Options menu.
③Settings ■Camera Settings: These affect camera controls.
■Graphic Settings: These affect game visuals.
These settings affect game performance. If your game runs slowly, disabling some of these may help improve performance.
•QualityAdjusts the overall level of graphic quality.
•ShadowsToggles the display of shadows on characters and the world.
•Depth of FieldAdds a blur effect when objects are far away.
•BloomToggles gradation and blurring from lighting effects.
•Atmospheric EffectsToggles atmospheric effects, such as lighting and fog effects.
•SSAOAffects the way shadows are displayed.
•VignettesMakes the edges of the screen grow dark.
•SSR (Reflections)Toggles the display of reflected light.
•RainToggles the display of rain.
•ResolutionAdjusts the quality of the world's graphics.
•Face LightingToggles facial lighting effects.
•Environmental LightingAdjusts the light source.
•ObstructionsAffects whether objects between your POV and the camera are displayed.
•Background ColorAdjusts the color of the background shown when no other background is available.
•Population LimitToggles whether a character will appear on the island. If changed while in-game, this setting will take effect the next time a saved game is loaded.
■Audio Settings: These affect the volume of the BGM and SE.
■Voice Settings: These affect the volume of various voice types.
■Game Settings: These affect various aspects of gameplay.
•Text SettingsThese settings affect how text is displayed during Communication scenes.
•FieldThese settings affect various aspects of the Game Screen display.
■Sex Scene Settings: These affect various aspects of sex scene gameplay.
•Display PlayerToggles the display of the player.
•Player PenisToggles the display of the player's penis.
•Player ClothesToggles the display of the player's clothing.
•Player AccessoriesToggles the display of the player's accessories.
•Player ShoesToggles the display of the player's shoes.
•Player Base ColorToggles whether the player is displayed as a simple color, and what that color is.
•Semen DisplayToggles whether fluids such as semen are displayed.
•Pissing/Squirting/GlossToggles the display of these effects.
•Display Pleasure GaugeToggles the display of the Pleasure Gauge.
•Display Menu IconsToggles the display of the icons that appear on the right side of the screen.
•Display Finish ButtonToggles the display of the button that automatically brings both characters to the verge of climax during sex scenes.
•Reset Camera DeterminationEnabling this automatically sets the camera to a predetermined angle when changing sex positions.
•Eyes Track Camera (Char 1)Adjusts the direction NPC 1's eyes are looking.
•Head Tracks Camera (Char 1)Adjusts the direction NPC 1's head faces.
•Eyes Track Camera (Char 2)Adjusts the direction NPC 2's eyes are looking.
•Head Tracks Camera (Char 2)Adjusts the direction NPC 2's head faces.
Hints
The Uploader
■The Uploader allows you to upload data you created, or download data uploaded by others.

-
To use the uploader, you need to register your handle name.
Enter the "handle name" and select "Apply".
- ○The Downloader:Here you can view a list of data others have uploaded and download it.

-
①Shared Menu
・Information on Selected DataDisplays information on the data selected in ③Data List.
・MenuChanges for the selected content.
・Search FiltersAdjusts the search conditions to filter displayed results in ③Data List.
・The UploaderSelecting this brings you to the Uploader screen.
・TitleSelecting this returns you to the Title screen.
②Change Type Changes the type of data that is displayed.
③Data List Displays a list of uploaded data.
④Navigate Page Navigates between pages on the ③Data List.
・◀/▶Move to previous/next page.
・|◀/▶|Move to first/last page.
・x/xDisplays the current/total page #.
⑤ ・DownloadDownloads the data selected in ③Data List.
・Update ListReconnects to the uploader to update with the latest data.
・Delete CacheDeletes the data cache for the data type currently selected in ②Change Type.
Note: Image data once viewed will automatically be stored in the cache. Deleting this data will free up HDD space, but may slow the display of data in ③Data List.
- ○The Uploader:Here you can upload data created in game.

-
①Toggle Data Display
Adjusts the type of data displayed in ②Data List.
②Data List Displays a list of created data.
③Data Preview Displays a preview image of the data selected in ②Data List.
④Comment Enter a comment for the data to upload here. Cannot be left blank, max character limit of 80.
⑤Upload Uploads the data.
・You must read and accept the Terms of Service in order to upload data.
・Upload cannot be completed until you check the "I Agree to the Terms of Service" box to agree.
・The button will display "Update" instead of "Upload" for characters that have been uploaded before.
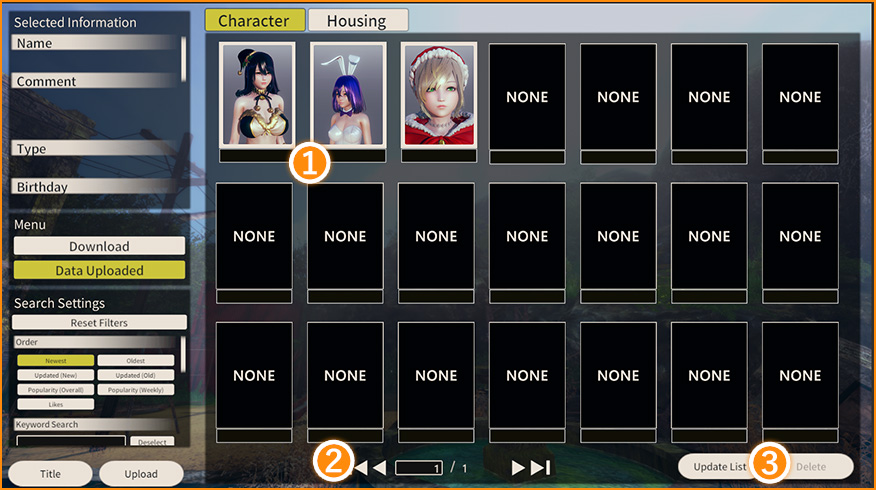
- ○Data Uploaded:Check data you've uploaded here, or delete data from the Uploader.
-
①Data List
Displays a list of uploaded data.
②Navigate Page Navigates between pages for the ①Data List.
・◀/▶Move to previous/next page.
・|◀/▶|Move to first/last page.
・x/xDisplays the current/total page #.
③Delete Deletes data selected in ①Data List from the Uploader.
The Keyboard Shortcut Menu
-
Press F2 to display a list of keyboard shortcuts.
Note: Screenshots are stored in the "Userdata/cap" folder in the game installation folder.
■Keyboard Shortcuts: Character Creation
■Keyboard Shortcuts: Movement/Dialogue
■Keyboard Shortcuts: Sex Scenes
■Keyboard Shortcuts: Housing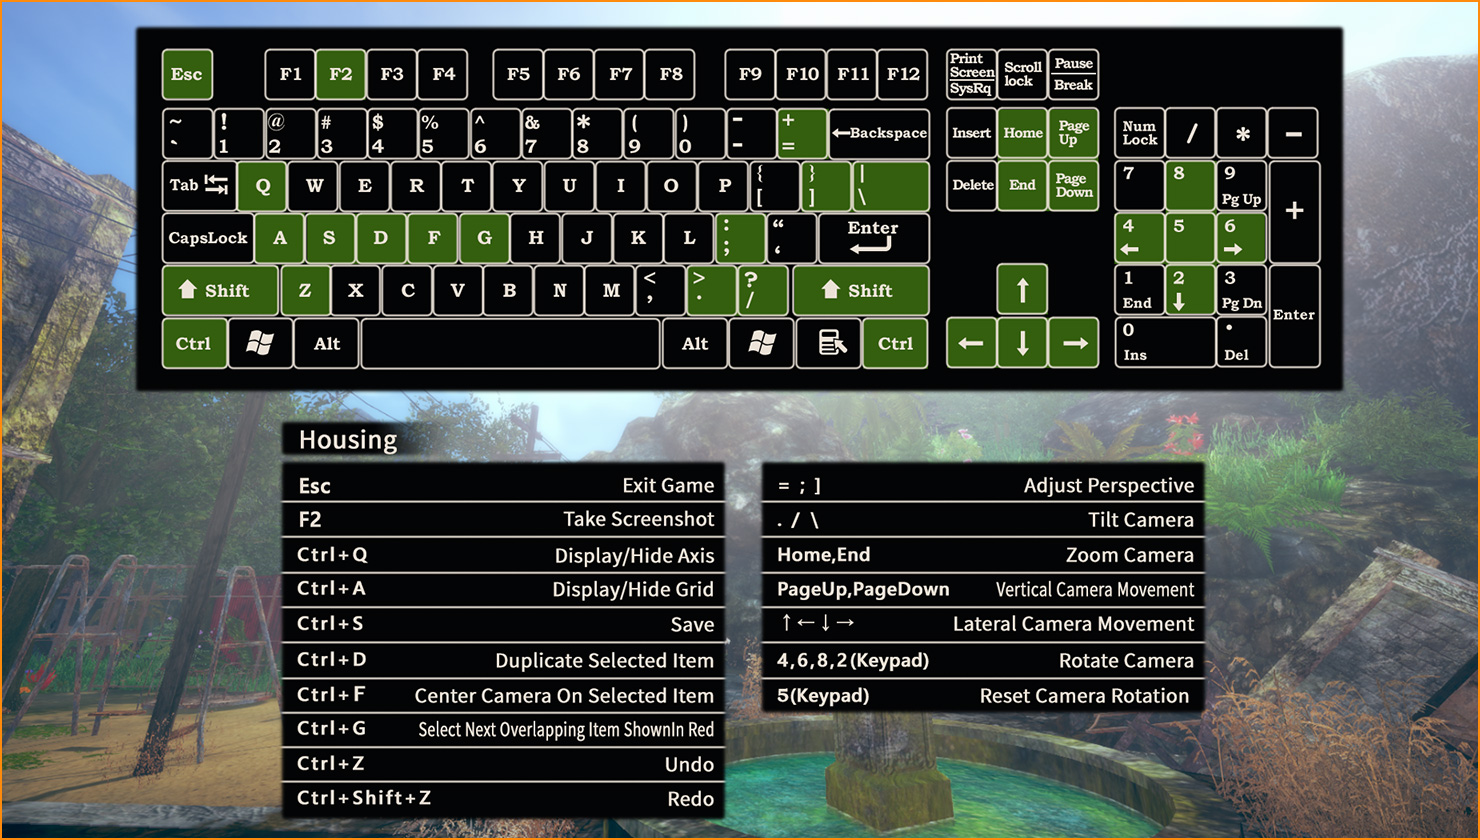
■Keyboard Shortcuts: Camera Mode
■Keyboard Shortcuts: Fishing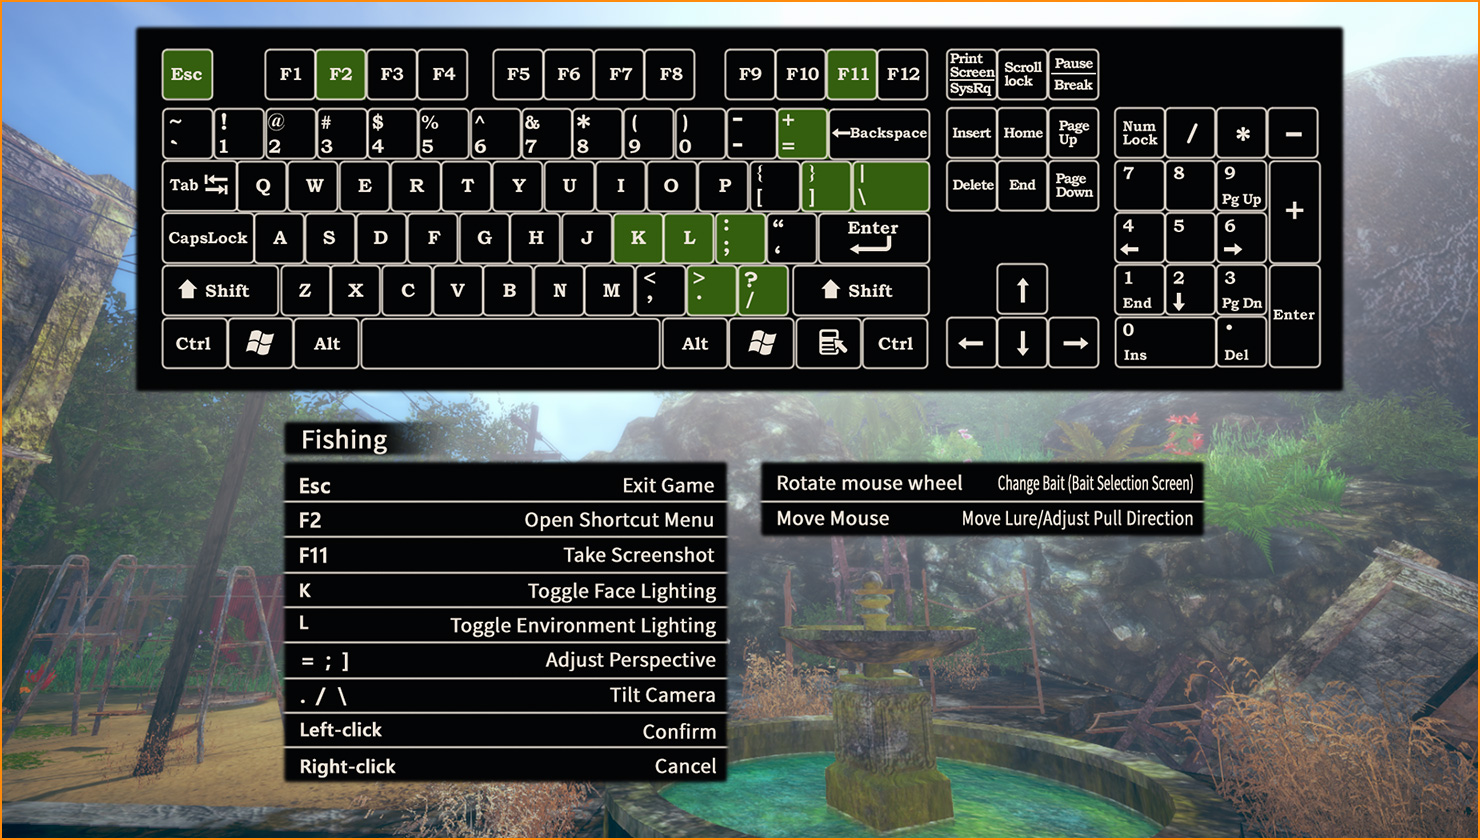
Troubleshooting
-
If the game won't run, or if the game doesn't work properly even when following the instructions in the manual, try one of the following common solutions.
Problem : The game won't load, it suddenly freezes, or it runs poorly.When the game won't run properly, it's usually because your system doesn't meet the minimum system requirements.
Before you try anything else, double-check to make sure your computer is powerful enough to run AI Shoujo
You can open the Initial Settings window and select "System Information" to see your computer's specs. You can find AI Shoujo's system requirements on your game's packaging, or see them here.
Warning: Follow the suggestions below at your own risk.
Illusion cannot be held responsible for any problems that occur from installing drivers. We will do our best to provide technical support, but any accidents that occur are the user's responsibility.
If you are unsure of how to install drivers or perform any of the following tasks, please contact your computer manufacturer for assistance.
(1) Update graphics card drivers
If your computer meets the game's system requirements but the game has trouble running, the problem is often out-of-date graphics drivers.
For information on how to update your graphics card drivers, please contact your computer or graphics card manufacturer for assistance.
You can also try changing the game's Setting Preset to Normal or Performance, switching graphics options, or changing to Windowed Mode.
(2) Disable background programs
Antivirus software and other background programs may interfere with the game's performance. Temporarily disable these types of programs before booting the game.
For information on how to disable these programs, please refer to the corresponding software's manual.
(3) Update computer drivers
The motherboard or sound card may be causing the problems you're experiencing.
Try updating all your computer's drivers to the latest versions.
For information on how to do this, please contact your computer or hardware manufacturer for assistance.
(4) Reinstall Windows
Windows itself could be experiencing problems. Backing up your computer, reformatting your hard drive, and reinstalling Windows may solve the problem.
Warning: Take great care to fully backup all of your data first. Illusion cannot be held responsible for any loss of data.
For information on how to reformat your hard drive and reinstall Windows, please contact Microsoft for assistance.
-
If you're still experiencing problems...The solutions listed above should solve most problems that you may experience. If you have any questions, please send an e-mail to our Online Support.
When you send an e-mail, save and include a copy of your System Information details, or include a text file with your system information.
E-Mail : [email protected]
-
Privacy PolicyIllusion handles all personal information, such as names, addresses, and e-mail, with the utmost care, and will not share your information with any third parties.

